
Mortar is the glue that bonds bricks together to form a strong and resilient structure. It starts life as a soft pliable material, hardening initially to support the evolving brickwork structure, then more slowly over time to achieve full strength. The composition of the mortar, which we will discuss later, will reflect the role it is designed for and be complimentary to the type of bricks used in the structure.
As mortar is an essential part of brick-built structures, the importance of maintaining and repairing it to the highest standards cannot be overstated. Whilst the work involved in Repointing Brickwork may be within the capabilities of competent DIY’ers, the scale of the challenge needs to be fully appreciated before committing to the enterprise. In particular, if you are going to Repoint a typical property, single or double-storey, you will certainly be ‘working at height’ and the work involved can NOT be undertaken safely from a ladder. Regardless of the methods used, dust will be generated during the raking out process, so as a minimum, you should use a face mask to protect from the hazardous airborne silica products which will be created.
Our objective in this article is to enlighten the reader on the specifics of the Repointing activity, namely raking out the old mortar joints, preparing them for new mortar, selecting and applying an appropriate mortar mix and then finishing the joint to withstand local weather conditions, whilst also having an eye to the aesthetic qualities of the finished work.
Pointing generally applies to the initial build process and in particular, the creation of the visible shaped joint between the bricks. Repointing is the repair of existing pointing, requiring removal of the damaged material and refilling with a new mortar mix.
Mortar is broken down by the action of various agencies and being softer than the surrounding bricks, it will usually be the first element to fail. Damp walls subjected to heavy frosts will cause mortar to expand and crumble. Movement in a building due to settlement can induce stresses which produce cracks within the mortar joint. Acidic rain, climbing plants such as Ivy and insects such as Masonry Bees can also be significant factors. Whatever the cause, if mortar is failing, it should be repointed before the damage gets worse.

There are often clear visual indicators that mortar joints are failing and the structure needs repointing. Less obviously, the first sign of deterioration may be small cracks between the mortar and the brick face, in essence breaking the bond between the two elements. Subjected to even moderate rainfall, such failures can lead to moisture seeping into the wall. A heavy frost will cause dampened mortar to expand and over time, crumbling of the mortar is inevitable. Repointing may also be required if a wall develops a crack which extends to the masonry. In this case the mortar bed is raked out (as described later) and helical reinforcing bars are set into a grout bed in the joint. The repair is then repointed.
To repoint mortar joints, the old mortar must first be removed, generally to a depth of at least 15 mm, but often much deeper (more on this later). This removal of old mortar is generally referred to as raking out. The traditional method of raking out was with a hammer and chisel - hard work and time consuming, although still applicable on very delicate structures where mechanical means would be harmful.
Applying new mortar to an existing raked-out joint is generally referred to as repointing. The traditional method of repointing was to push the mortar into the raked out space with a trowel or jointing tool.
Modern methods of raking out and repointing have made the work easier and faster – but the ‘old ways’ still have their place and relevant tools are still available (more on raking out and repointing below)
Joints should be raked out to a depth not less than twice the height of the vertical joint between the bricks – so if the existing brick joint was 8 mm tall, rake out to a depth of 16 mm. In all cases, minimum raking depth is 15 mm for Flush-finished joints, and perhaps a few millimetres more for Recessed Joints – see section below on Mortar Joint Finishing
Joints can be raked out the traditional way using a chisel and hammer.
Handheld and wheeled raking tools are also available, but will only be effective on very soft crumbling mortars.
Diamond Blades and Mortar Rakes can be fitted to angle grinders to speed the process; these systems are more likely to deliver a consistent raked-out depth.
Regardless of the method used, a consistent raked-out depth is very important and the brick faces above and below the joint must have all traces of the old mortar removed.
Mechanized methods will create high volumes of dust, so dust control and extraction facilities are essential for protection of the workforce and for other persons in the vicinity. Using a dust extractor will also ensure the bulk of the waste material is collected at the workface and not spread over the local area.
At this point, professionals will brush or vacuum out the joints and wash down the surface, to ensure all dust residues are removed, thereby permitting the new mortar to bond better with the brick faces. The benefits of raking out using dust control and extraction facilities become very apparent at this point – washing down a dust-laden wall will create a considerable mess and is likely to stain the brickwork; washing down a surface where the majority of the dust and waste has been captured during raking out is cleaner and should leave no staining.
Earlier we commented on how repairs due to cracking would necessitate local repointing. If renovating an ageing structure, it is likely remedial work on cracks will be undertaken, as will replacement of surface damaged bricks, a condition generally referred to as “spalling”. As it can be difficult to find a matching brick to fit within an old structure, an alternative may be to remove the “spalled” brick and rotate it through 180 degrees such that the previously protected inner face is now showing and hopefully presents a good match with the surrounding area. Such work can be done using hand tools, but a more popular and efficient method is to use a Plunge Cutting Saw, which can remove mortar to the full depth (probably 100 mm) without damaging the brick or the surrounding area. Such a tool will feature widely on Heritage or Historic projects.
With the joint fully prepared, it is now time to insert replacement mortar. In a later section, we explain the composition of a mortar mix and the options available to suit different situations. It is very important the new joint is completely filled with mortar and as best possible, is of equally density and finished with the same surface pressure.
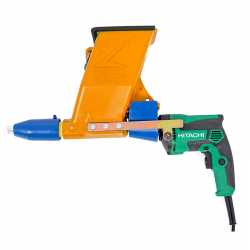
Traditionally the mortar will have been pressed into the joint by hand, using a variety of shaped tools or even a small pointing trowel. Mechanized solutions to this work include manual or air-powered pressure guns (manual pressure guns are generally known as ‘mastic guns’) or electric-powered auger-fed systems. Used properly, the mechanical methods should more easily ensure the joint is fully filled (air gaps in a mortar joint will weaken it considerably). Personal preferences will dictate whether the bed joints or ‘perps’ (perpendicular joints on the end of the brick) are filled first.
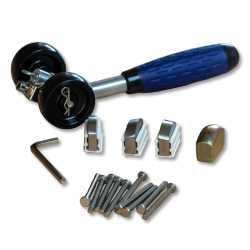
Having inserted the new mortar, it is important it is compacted to ensure all voids are removed and a consistent density of material is in place, thereby ensuring the hardened mortar has equal strength across the joint. A joint which is compressed at a constant pressure along its length, is more likely to dry out to an even colour. The process of finishing and shaping the joint is generally known as “striking” or “ironing” and is invariably a manual operation using either Free-hand or Wheeled Pointing Irons
The most commonly used mortar joint profiles are Bucket Handle, Weatherstruck and Recessed.
Bucket handle – a concave profile, so named as it can be produced with a shaped piece of round bar, akin to that used on the handle of a bucket. Provides good resistance to rain and can offer a clean uncluttered look with many styles of brick
Weatherstruck - a downwards angled profile, sometimes with the addition of an extended (cut) lower edge. Overall objective is to deflect or ‘shed’ the water off the wall. Provides good weather resistance and popular in situations where heavy rainfall is common. Angled profile may also add a light/shade effect which can be an attractive addition to some brick installations.
Recessed – a flat vertical profile where the finished face is within the joint, typically ‘recessed’ 3 to 5 mm from the outer face of the bricks. Generally adopted as a means of adding a shadow effect to the façade. Not suited to weather-exposed situations and recess best kept to less than 5 mm to minimise water collection on the exposed brick edge
Joints profiles such as Arrowhead, Reverse Arrowhead (also known as Double Struck and Birds Beak) and Tuck Pointing (having an inset bead of Lime Putty) are most probably best left to the professionals. There are numerous other styles and variations that are best suited to the expert touch.
To permit the new joint to blend with the existing brickwork, it may be appropriate to brush finish joints when the mortar has hardened.
Cement and sand mixed with water makes concrete. Cement and sand, with the addition of plasticizer or lime (all mixed with water)makes a building or pointing mortar.
Sand is the major component of a mortar mix and will vary depending upon where it is sourced, which can be on land or sea-dredged. Sands used for mortar mixes will be graded finer than those used for concrete mixes.
Cement acts as a binder in the mix.
Mortar Plasticizer is a chemical additive which improves the workability of mortars.
Lime is frequently used as an alternative to chemical plasticizer, most notably on old buildings, where it will be ‘kinder to’ the brickwork than a cement-based mortar.
Sand, Cement, Lime and/or Plasticiser have to be mixed in proportions that will deliver a mortar appropriate to the structure and weather conditions it must support. A useful point of reference regarding Mortar Mix compositions, for a range of situations, is NHBC Appendix 6.1 (NHBC is the UK National House-Building Council). Appendices 6.1A and 6.1B plot Weather, Rain and Frost exposure levels for all regions of the UK. Appendix 6.1C correlates mortar compositions (relative amounts of sand, cement and lime where applicable) to the weather parameters detailed in 6.1A & 6.1B
A typical mortar mix for Repointing purposes, for use in an area subject to normal weather conditions, would comprise 1 part Portland Cement, 1 part Lime and 5½ parts Sand. If you need to match new and existing mortars, unless you hold details of the original mix, it is likely to be a process of trial and error, to achieve a satisfactory outcome. Cement dyes are available and may aid in achieving a colour match.
Lime can be very beneficial in repointing mortars. Lime mortars generally cure or set more slowly and in doing so, are less prone to shrinkage and cracking. Lime mortar is also more permeable and will allow trapped moisture to escape the structure. In cement-based mortars (without lime) additives may be used to accelerate or slow the setting process and in cold weather, to protect drying mortars from frost. It is not uncommon to sieve a sand when preparing a mortar mix for pointing, both to remove impurities and to produce a consistency that can be processed through an applicator.
If you require guidance on matters relating to Raking or Repointing, email enquiries@sunrisetools.co.uk or call 01794 830 841.
If you have any comment to make on this article, we will be pleased to hear from you by email or phone.
When does a wall need repointing?
There are often clear signs the mortar joints are failing and the structure needs repointing. At other times, the first sign may be small cracks between the mortar and the brick face, in essence breaking the bond between the two elements. Subjected to even moderate rainfall, such failures can lead to moisture seeping into the wall. A heavy frost will cause dampened mortar to expand and over time, crumbling of the mortar is inevitable. Damp walls are often the first sign that repairs are needed to the mortar. Repointing may also be required if a wall develops a crack which extends to the masonry, in which case, strengthening of the wall may be needed, before renewing the mortar joints.
What is the best way to remove the old mortar?
Firstly, it could be removed by hand, with a hammer and chisel and this method might be entirely appropriate for small areas or sensitive structures. More commonly, power tools are used to speed the process and achieve consistent results. These generally constitute a small format angle grinder, fitted with either a circular diamond blade or a tungsten mortar rake. In both instances, a method of ensuring a consistent depth of ‘raked out’ joint and the removal of dust and debris are pretty essential and angle grinder attachments are available with these combined functions. Both the foregoing methods will apply to regular brick or stonework structures where straight joints are present. Irregular joints, such as those you will find on a random stone structures, can probably only be ‘raked out’ with a mortar rake.
What is the best repointing mortar?
Much will depend upon the what, where and how of the job. If repointing small areas, it may be important to ensure colour matching, whilst repointing a complete wall should remove that constraint. Properties over 100 years old will almost certainly have been constructed using lime-based mortars and here it is advisable to use a lime product and not just for aesthetic reasons. Experienced tradesmen will be adept at producing consistent batches of self-mixed pointing mortar but for the less skilled, pre-mixed pointing mortar requiring only the addition of water is a much safer bet. And weather is an important consideration – whether it’s the alignment of your property or the part of the country you live in, the mortar needs to be formulated for the weather conditions it will be expected to endure.
What is the best way to put mortar into the joints?
Before we consider the how, its best to reflect on why the work is being undertaken and what is expected of the finished joint. The new mortar will be required to strengthen the structure and provide a sealed face to the weather. For that to be achieved, the joints must be of sufficient depth, be free of voids and be well compacted so as to bond with the existing structure. And the external face must be sealed, a process generally known as ‘ironing’. You can fill the joints with a small trowel, use a hand-operated ‘mastic’ gun or a powered device, most likely electric or air-driven.
What is the best way to finish the mortar joint?
Mortar joints are usually finished (‘ironed’) with a few common shapes or ‘profiles’. Bucket Handle is a basic concave finish. Recessed Joints, as the name suggests, sit a short distance behind the face of the brickwork – this is primarily for decorative reasons but the joints still need to be ironed to ensure proper sealing. Weatherstruck is an angled profile which is very effective at shedding water, so appropriate for walls regularly subjected to driven rain or spray. There are a number of other specialist profiles which will most probably apply to older properties or be unique to a geographic location. Regardless of the profile chosen, the mortar must be sufficiently compressed to constitute a strong joint and provide an outer skin that can not easily be penetrated by moisture.
Should I seal the finished mortar joint?
It can be appropriate to seal brickwork, usually if there is an inherent porosity that would otherwise only be addressed by replacement of the structure. In doing so, it is entirely acceptable to seal the mortar joint. However, it is important to use a sealant that remains permeable, so that the brickwork can continue to ‘breathe’. In addition, it is not advisable to seal new mortar joints before they have fully dried out.
February 2018
.png "LOLER - How does it apply to Manhole Cover Lifters | Sunrise Tools")


